Pro Tip Tuesday: Navigating the Givelify Dashboard
Givelify provides a detailed giving app account dashboard for the benefit of our member organizations. If you want to find any information about your account, or make any changes, this is the place to look.
But upon first glance, the dashboard may seem a bit daunting. This blog post will help you navigate each section of the dashboard, and understand how you can use it to boost your giving app donations.
Let’s get started. First, to access your organization’s Givelify dashboard:
- Visit www.givelify.com on your computer
- Click Log In at the top right of your screen
- Type your e-mail address and password into the spaces provided
- Click the Sign In button
Donations
At the top right of the dashboard screen, you will find three clickable links: Donations, Givelithon, and Settings. You are already on the Donations section by default.
At this point, you will see your organization’s Home screen. The total giving app donations received by your organization will be displayed here, along with the total number of donors, the average donation amount, and a chart containing the campaign types. By clicking the drop-down box at the top that says Lifetime, you can select different time periods to view.
Received
Click to Enlarge
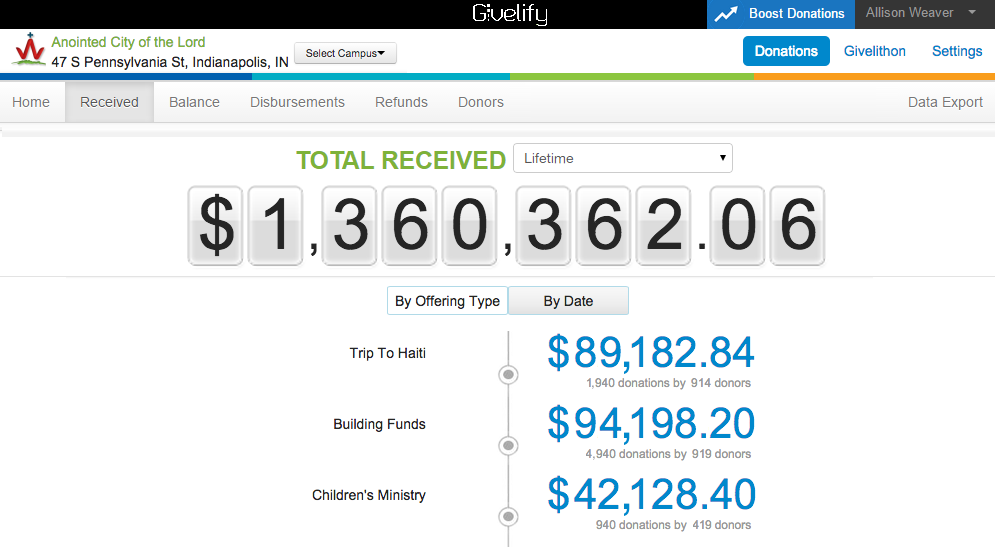
By clicking on the Received tab at the top left of your screen, you can get a more detailed view of the donations your organization has received. Using the tabs that appear under the total received, you can sort by campaign/offering type or by date.
To see even more details, including donor names and the specific amounts given by each donor, click on the numbers that are highlighted in blue. From here, you can also switch between the different campaign/offering types to get detailed views of each.
Balance and Donors
To view all giving app donations that have been made to your organization but have not yet been deposited into your bank account, click on the Balance tab at the top of your screen.
By clicking on the numbers that are highlighted in blue, you can open a box with details about each donation, including the donor’s name, the date and time of the donation, the campaign/offering type, and the fees that were deducted (2.9% + $0.30).
If you click on the donor’s name, you can view all donations this person has made to your organization using the Givelify giving app.
You can also access information about your individual donors by clicking on the Donors tab. Here, you can search by the donor’s name to look up information about their donation history. You can also sort donations by the largest, smallest, oldest, or most recent.
Disbursements and Refunds
Under the Disbursements tab, you can find information on the donations that have been disbursed to your organization. To view further details about who made the donations included in each disbursement, click on the amounts highlighted in blue.
In some rare cases, donations may need to be refunded. To view all records of refunds, click on the Refunds tab. Every refund amount will be listed here, along with the name of the donor who received it.
Data Export
To download a report of the donations made to your place of worship or nonprofit organization using the Givelify giving app, click Data Export at the top right of your screen.
On the following screen, choose one of two options: export a list of all donations listed chronologically, or a list of all donors and their donations listed alphabetically. Once you have made that selection, you can enter a range of dates.
Hover over Export with your mouse to open a drop-down window, and then select which type of file you would like to see: an Excel spreadsheet or a CSV file. When you click your selection, a report will be generated that you can open or save to your computer.
Givelithon
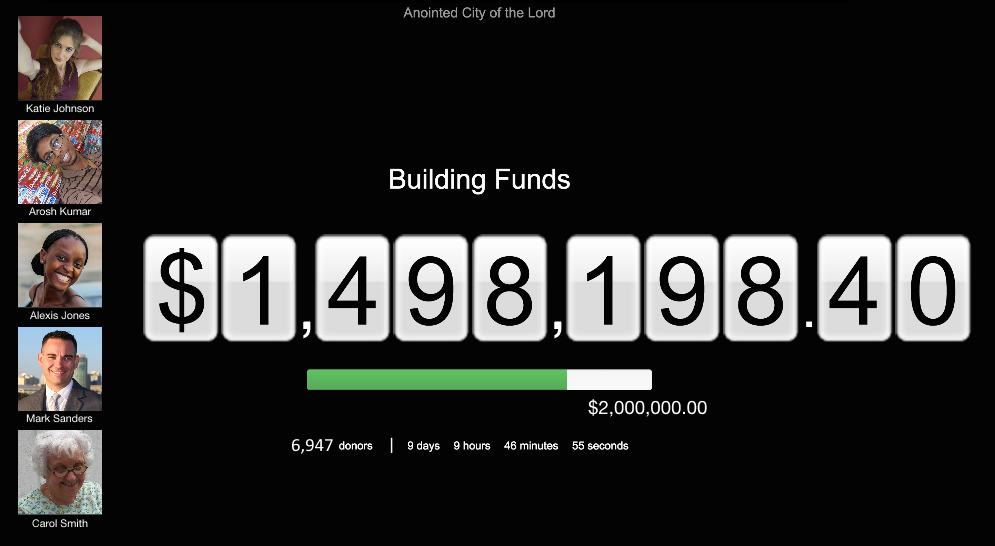
Now you have viewed everything under the Donations portion of the dashboard. Return to the top right of the dashboard screen and click on Givelithon.
Here, you can access the very helpful Givelithon feature. This enables you to show a live, running total of donations during fundraising events or church services. Learn more about how to get the most out of this feature.
Settings
Now click the Settings tab at the top right of your screen. In this section of the dashboard, you will find everything you need to customize your Givelify giving app and manage your account.
By default, you will be on the App Profile tab. This is how you add images to your app profile. When you hover your mouse over the image of the phone, three links will appear. By clicking on each of these respective links, you can add a cover photo and your organization’s logo to your profile. If your organization is a place of worship, you can also upload an image of your main church leader.
Offerings/Campaigns
For places of worship, the second tab at the top of the screen will read Offerings. For nonprofit organizations, it will say Campaigns. This section of the dashboard enables you to set up custom envelopes so that your donors can direct funds to specific campaigns.
By clicking the blue button at the top right, you can set up as many new campaigns or offering types as you like. For example, you might set up special campaigns for:
- Building Funds
- Missions Trips
- Nonprofit Fundraising Events
- Christmas Charity Drives
Officers and Banking
Would you like to give more people access to your giving app account? You can do so under the Officers tab. Learn more about adding and removing officers — and setting limits to what certain officers can access.
Under Banking, you can add, remove, or update the banking information you have on file with Givelify.
About and Campuses
To make changes to the information displayed on your giving app profile, such as the address, phone number, or website of your organization, click on the About tab. You can make changes to the physical address where you are located, the mailing address where Givelify should send correspondence, and also add a contact email address for your place of worship or nonprofit.
Does your organization operate in multiple locations? Do you want all of their donations to be disbursed into the same bank account? To do this, click on the Campuses tab and set additional locations as campuses. Learn more about adding campuses.
Deep Linking
At the top right of your screen, you will see a tab for Deep Linking.
Does your organization already have an app? Deep Linking enables you to integrate Givelify with your existing app by adding a “Give Now” button. When users tap that button, the Givelify app will open automatically to your organization’s app page.
Learn more about Deep Linking.
Boost Donations
Want to get the best results from your organization’s Givelify giving app account? We have dedicated a special portion of the dashboard to help.
Click the blue Boost Donations button at the top right of your screen. From here, you can:
- Request posters and donation slips
- Locate the Givelify app demo video and show it to your supporters
- Go through our set of guidelines to make sure that your account is fully set up
Have more questions about using your Givelify giving app account? Visit our online Support Center to find answers to some of our most common inquiries.
About the Author